


A professional-looking paint job is achieved not through advanced brush techniques, but through meticulous prep work. The time invested in preparing your walls before opening a can of paint directly determines the quality and longevity of the final result.
The Foundation for a Flawless and Lasting Finish
Think of wall preparation as the foundation of a house; a structure built on a weak base will not stand. Applying high-quality paint over a dirty or damaged surface is a similar mistake. The paint will not adhere properly, leading to a premature failure of the finish.
Dedicating sufficient time to prep work establishes the foundation for a finish that not only looks exceptional but also withstands the demands of daily life for years.
Preventing Common Paint Problems
Proper preparation is the most effective defense against common painting issues. Problems such as bubbling, peeling, or blotchy finishes are, in 9 out of 10 cases, the result of inadequate prep, not faulty paint.
- Peeling and Bubbling: This classic sign indicates that paint was applied over dust, grease, or moisture. The paint cannot form a strong bond with a contaminated surface.
- Uneven Colour: Walls and patched areas absorb paint at different rates. A quality primer seals the entire surface, ensuring the topcoat dries uniformly and the colour appears as intended.
- Visible Imperfections: A fresh coat of paint, particularly with any sheen, highlights every nail hole, crack, and bump. Patching and sanding are essential for creating a truly smooth, unblemished canvas.
In Toronto and the GTA, fluctuating humidity levels make proper prep even more critical. Since moisture is a primary inhibitor of paint adhesion, starting with a clean, dry, and correctly primed surface is non-negotiable for a long-lasting job. Before learning the specifics of how to paint interior walls, mastering this initial stage is essential.
The objective is not simply to apply a new colour to the wall. It is to create a durable, attractive surface that protects the home and enhances its value. Rushing the preparation phase is the most significant error in the painting process.
Beyond physical wall prep, a flawless finish also begins with strategic planning. For homeowners in areas like Mississauga, planning your room layout effectively can significantly impact the final ambiance of the space, well before any physical work begins.
Assembling Your Wall Preparation Toolkit
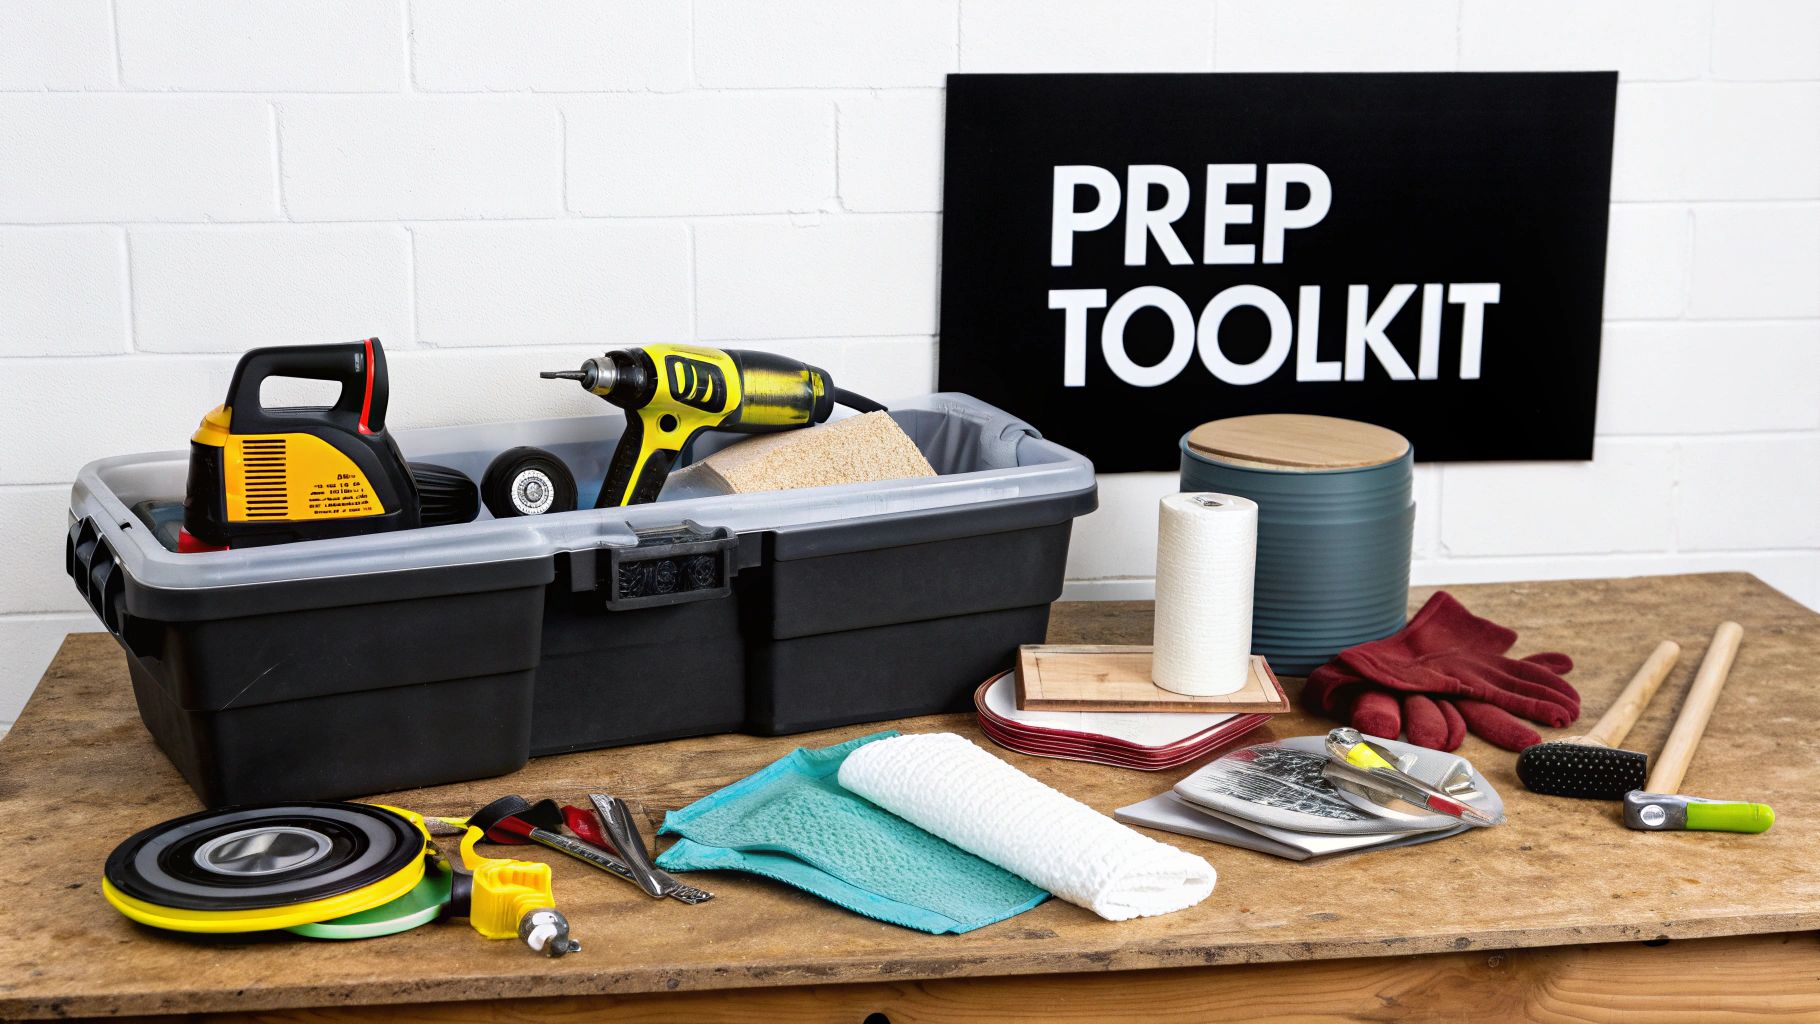
Approaching a project with the correct equipment streamlines the process and ensures a high-quality outcome. Having all necessary tools for how to prep walls for painting readily available allows for focus on the task, eliminating interruptions for hardware store trips.
The toolkit can be organized into three phases: cleaning, repairing, and finishing. Each stage requires specific items to achieve the perfect canvas for your new paint.
This checklist outlines the essential tools and materials required before starting.
Essential Wall Preparation Toolkit
| Category | Essential Item | Pro Tip |
|---|---|---|
| Cleaning | Drop Cloths | Canvas is reusable and less slippery than plastic, making it a sound investment. |
| TSP Substitute or Mild Detergent | A TSP substitute is effective for greasy kitchen walls; most rooms require only soap and water. | |
| Sponges and Clean Rags | Use a large sponge for washing and microfibre cloths for a final, streak-free wipe-down. | |
| Repairing | Spackle & Joint Compound | Spackle is for small nail holes; joint compound ("mud") is for larger repairs. |
| Putty Knife (2-inch and 4-inch) | Use a flexible 2-inch knife for spackle and a wider one for feathering out larger patches. | |
| Mesh Tape | Essential for repairing cracks to prevent them from reappearing. | |
| Sanding & Priming | Sandpaper (120 and 220-grit) | Start with 120-grit to smooth the patch, then finish with 220-grit for a seamless blend. |
| Sanding Block or Pole Sander | A block offers control for small spots; a pole sander is efficient for larger areas. | |
| High-Quality Primer | Primer is essential to seal patches and ensure an even, true-to-colour topcoat. | |
| Brushes and Rollers | Choose applicators suited for primer. A quality roller provides a smoother finish. |
Having these items ready will facilitate a smooth project from start to finish.
Essentials for Cleaning and Surface Prep
Before addressing imperfections, walls must be completely free of dust, grime, and oils. This is a non-negotiable step, as proper paint adhesion depends on a clean surface.
- Drop Cloths: Canvas drop cloths are recommended for their durability, absorbency, and reusability. They remain in place better than plastic and present less of a trip hazard.
- Mild Detergent or TSP Substitute: While Trisodium phosphate (TSP) is effective, a TSP substitute is a safer, more eco-friendly option for cutting through kitchen grease. For most rooms, a solution of mild soap and water is sufficient.
- Sponges and Clean Rags: A large sponge is ideal for washing walls. Follow with microfibre rags to remove any residue and ensure the surface is completely dry.
Tools for Repairing Wall Imperfections
Once walls are clean and dry, it is time to address any dings, holes, or cracks. This stage creates the perfectly smooth surface required for a professional-looking paint job.
The choice of filler depends on the repair. Spackle is the best choice for small nail holes and minor dents. It is lightweight, dries quickly, and is easy to sand. For larger holes or cracks—anything wider than a quarter-inch—a more robust material like joint compound is necessary. It is stronger and less prone to shrinking, making it ideal for substantial repairs.
For homeowners in older Toronto homes, stress cracks often appear near door frames due to settling. Using fibre-reinforced joint compound or applying mesh tape before the compound provides extra strength to prevent these cracks from returning.
Gear for Sanding and Priming
Sanding is not about aggressive abrasion; it is about creating a fine, uniform "tooth" for the primer to grip. This critical step ensures that patches blend invisibly into the surrounding wall. After determining your needs, you can predict the material costs for your wall preparation project to maintain your budget.
The following items are needed to complete the job correctly:
- Sandpaper: A variety pack is useful. 120-grit is effective for the initial sanding of patches, while a finer 220-grit is perfect for feathering the edges for a final, smooth touch.
- Sanding Block or Pole Sander: For small patches, a handheld sanding block provides excellent control. For sanding an entire room, a pole sander saves physical strain and allows for quick, even coverage.
- Putty Knife: A flexible 2-inch putty knife is ideal for applying spackle. A wider 4 or 6-inch knife is better for feathering out joint compound on larger repairs, helping achieve a seamless blend.
- Primer, Brushes, and Rollers: Quality primer is essential for sealing patches and ensuring the final colour looks rich and even. Selecting the right applicators is equally important; consult our guide on selecting the best paint brushes and rollers for a smooth application.
Start with a Clean Slate for Flawless Paint Adhesion
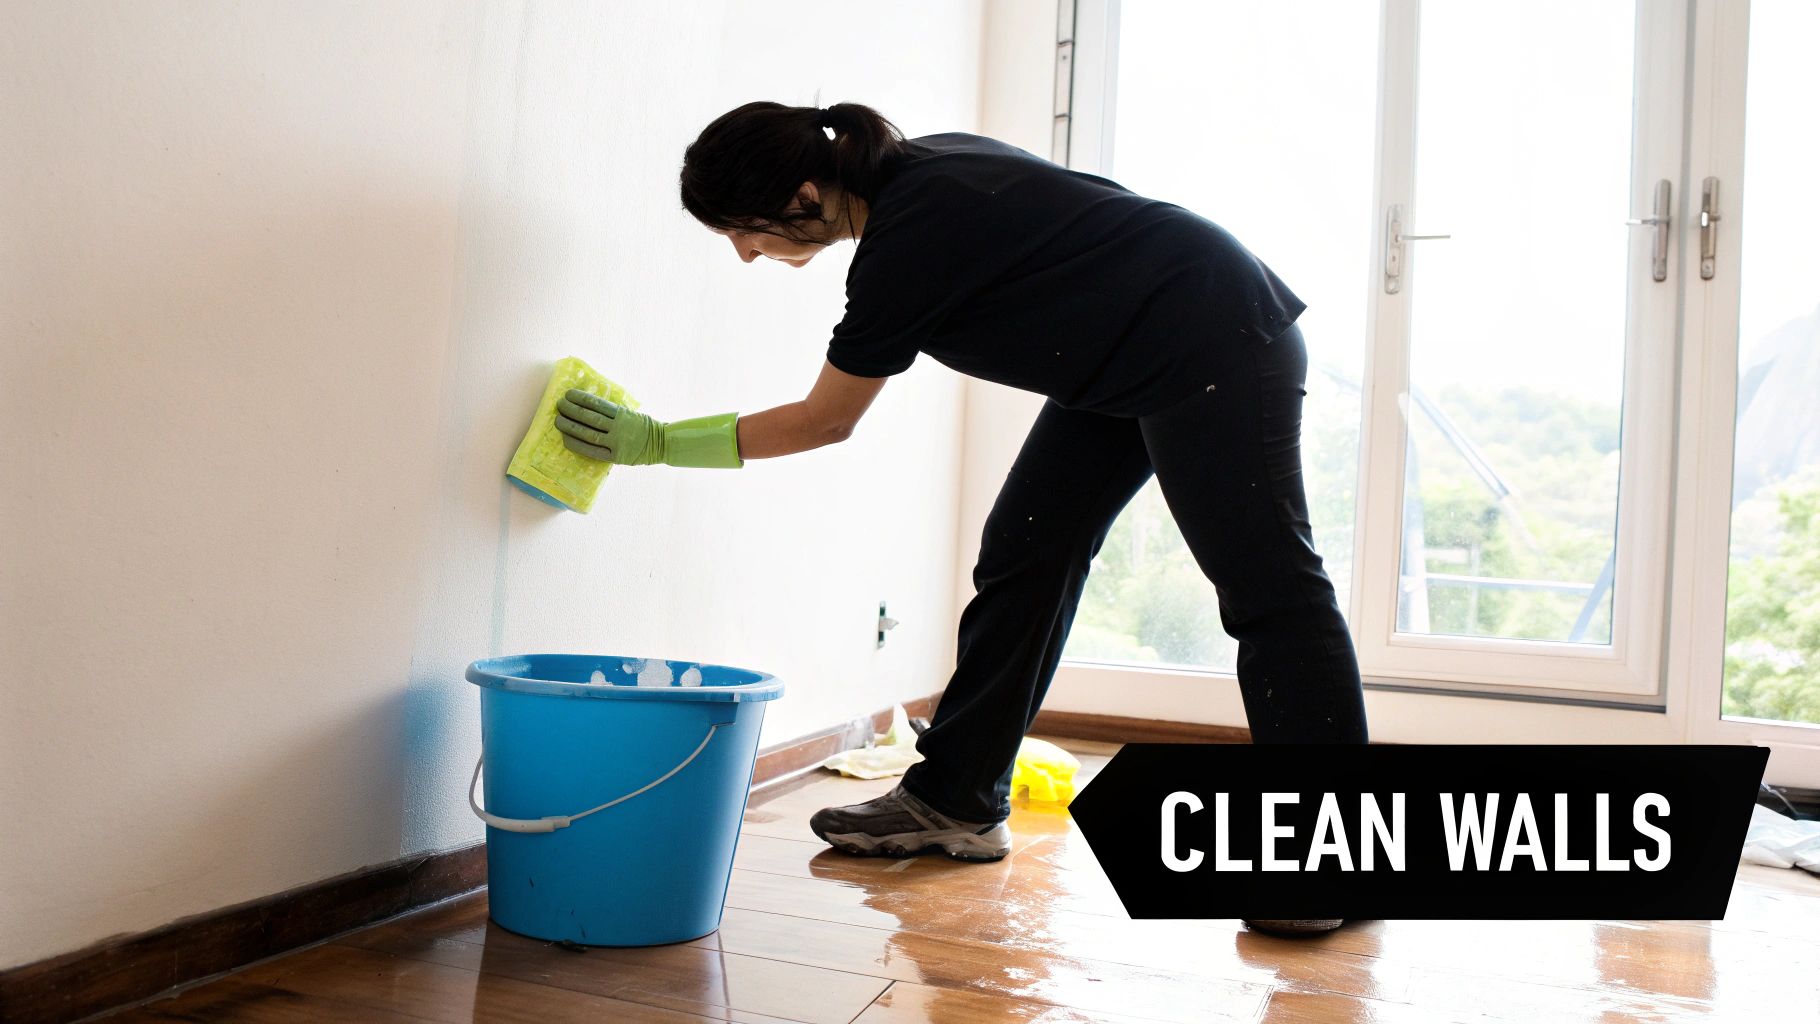
While the impulse is to apply the new colour immediately, paint will not adhere to a dirty surface. The first critical step of any paint job is a thorough cleaning. Unseen dust, grease, and grime are the primary causes of peeling and chipping.
Properly cleaning the walls is the difference between a finish that lasts for years and one that fails within months.
Create Your Workspace
Before cleaning, clear the room. Remove as much furniture as possible. For heavy items that must remain, move them to the center of the room and cover them completely with a heavy-duty canvas drop cloth.
Next, protect the floors. A canvas drop cloth is preferable to plastic as it is less slippery and absorbs minor spills. Secure the edges with painter's tape to prevent seepage.
The Right Cleaning Solution for the Job
Different walls require different cleaning approaches. For most rooms, such as bedrooms or living rooms, a simple solution is sufficient.
- For Everyday Dust and Dirt: A few drops of mild dish soap in a bucket of warm water is generally all that is needed to remove dust, cobwebs, and light scuffs.
- For Greasy Kitchen or Bathroom Walls: These high-traffic areas often have significant buildup. A stronger solution, such as a dedicated degreaser or a Trisodium Phosphate (TSP) substitute, is required to cut through stubborn grease or soap scum.
- For Crayon and Scuff Marks: For tougher stains, such as those in a child's room, a magic eraser sponge or a paste of baking soda and water can often lift the marks before the main wash.
An important aspect of prepping walls for painting is understanding that even invisible grime can compromise the result. Kitchens, for example, often have a fine layer of cooking oil on all surfaces. A good degreasing solution is non-negotiable in this space.
Begin washing at the top of the wall and work downward with a large, soft sponge, wringing it out frequently to prevent drips. After washing, perform a final pass over the entire surface with a clean sponge and fresh water to rinse away any soap residue.
Tackling Stubborn Stains and Old Surfaces
In some cases, a standard wash is insufficient. Walls that previously had wallpaper may have sticky adhesive residue. This film must be completely removed, or the new paint will not adhere properly. For this situation, our guide on how to remove wallpaper easily provides detailed instructions.
This level of prep is a universal standard for a long-lasting finish. In climates like California, for example, proper surface prep is paramount. The intense sun can degrade paint quickly, so taking the time to wash and prime can extend a paint job's life from just a few years to over a decade. With more than 31,000 painting businesses in that state alone, the demand for correctly done prep work is massive. You can learn more about exterior home repainting in California.
Finally, allow the walls to dry completely before proceeding. Trapped moisture is a primary cause of blistering and peeling paint. Be patient. Opening a window or using a fan can accelerate the drying process, ensuring a perfectly clean and dry canvas for the next stage.
How to Repair Wall Imperfections for a Smooth Canvas
A professional-looking paint job cannot be achieved on a flawed surface. With the walls clean, the next critical step is creating a perfectly smooth canvas. This involves repairing every nail hole, dent, and crack that would otherwise be prominent under a new coat of paint.
A fresh coat of paint, especially with a satin or semi-gloss sheen, magnifies imperfections. Skipping the repair stage is a common mistake that undermines the entire project. Taking the time to patch correctly is what distinguishes an amateur job from a flawless, professional finish.
Matching the Repair to the Damage
The first step is to identify the type of damage. A small pinhole requires a different solution than a recurring crack over a doorway.
- For Small Nail Holes and Minor Dings: Lightweight spackle is the ideal choice. It is easy to work with, dries quickly, and sands smooth with minimal effort. It is perfect for the numerous small holes left after removing pictures and shelves.
- For Larger Holes or Dents: For a hole from a wall anchor or a dent from a doorknob, a product with more substance is needed. A vinyl patching compound or standard joint compound provides better strength and is less likely to shrink and create a divot as it cures.
- For Active or Recurring Cracks: Hairline cracks above doorways or in corners are typically "stress cracks" from the house settling. Simply filling them with compound is a temporary fix. For a permanent solution, use joint compound with fibreglass mesh tape to provide the necessary strength to resist movement.
Selecting the right product is fundamental to a lasting repair. This visual guide simplifies the process, from problem identification to choosing the correct solution.
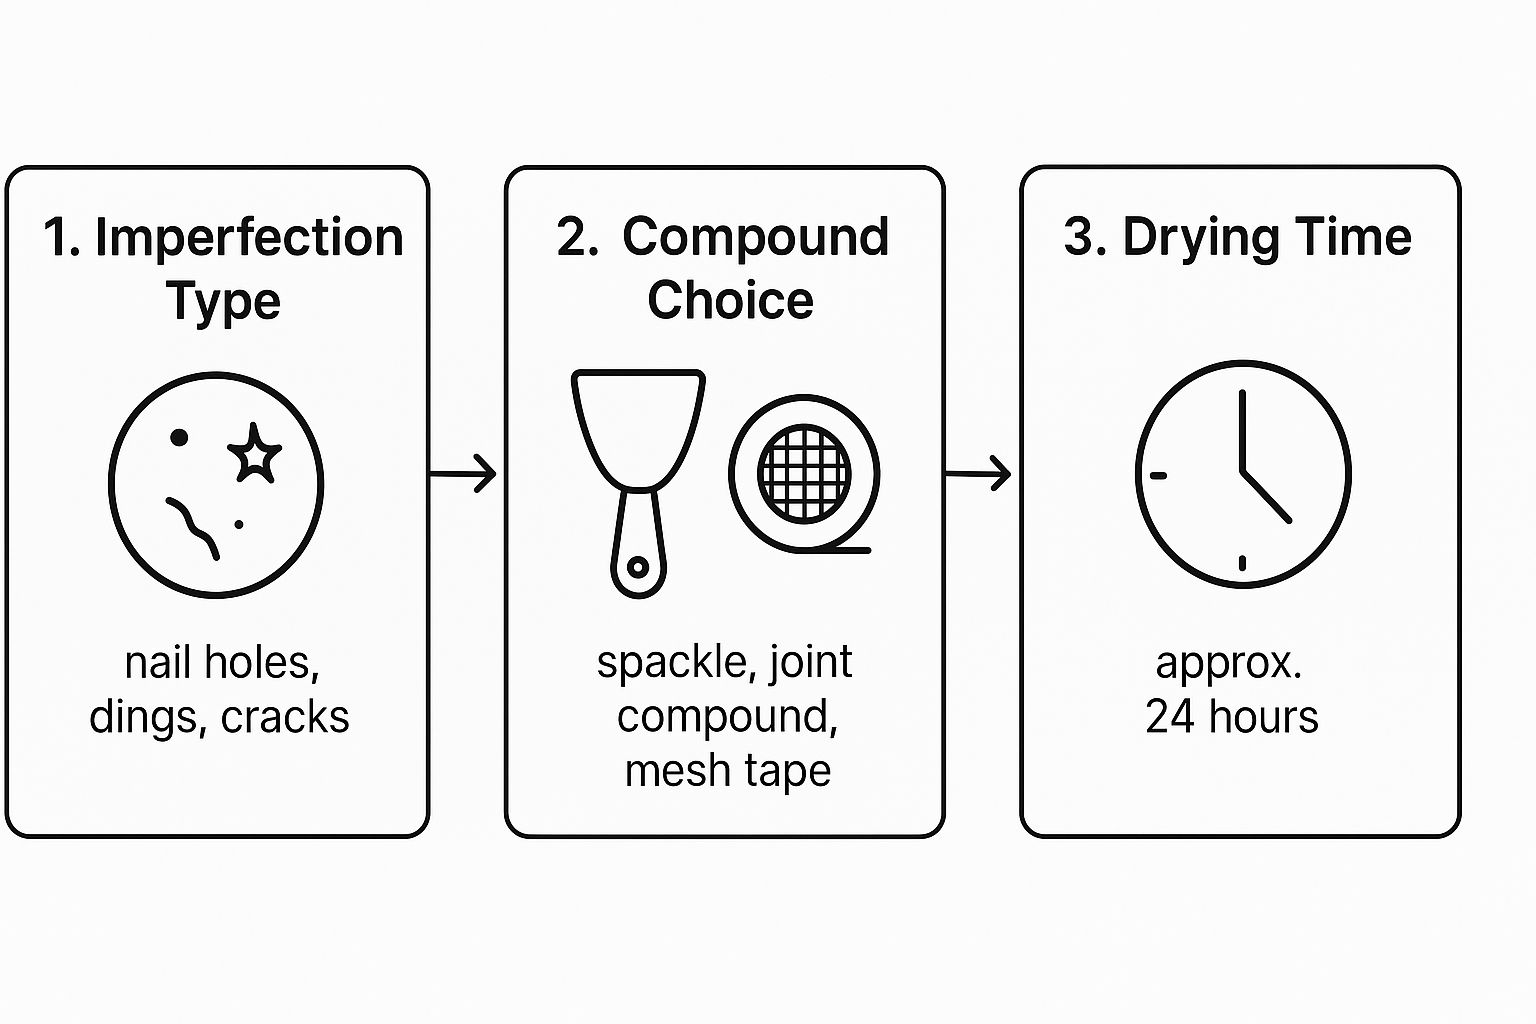
As shown, the type of damage dictates the choice of material, which in turn determines the necessary drying time.
The Art of a Seamless Patch
Applying filler is simple; making it disappear is the skill. The secret to an invisible patch lies in the technique of feathering.
The goal of feathering is to create a gradual transition from the patched area to the existing wall. This prevents a noticeable raised spot after painting. Use a flexible putty knife, applying more pressure on the outer edges of your patch to thin the compound out, blending it seamlessly into the surrounding surface.
For a simple nail hole, a small dab of spackle on a fingertip or the corner of a putty knife is sufficient. Press it into the hole, then scrape it flat. For larger repairs, apply the compound in thin layers rather than one thick application to prevent cracking and shrinkage.
If the wall itself has flaking paint, this indicates a more significant issue. Patching is ineffective if the underlying surface is failing. Our guide on how to fix peeling paint explains how to address this problem first.
Handling Textured Walls
Repairing textured walls, common in many homes across Mississauga and the GTA, presents an additional challenge. Sanding a patch smooth on a textured wall will result in a conspicuous flat spot.
Once the patch is cured, the existing texture must be replicated. Aerosol spray-on texture products are available at hardware stores in various patterns, such as "orange peel" or "knockdown." It is advisable to practice on a scrap piece of cardboard first to get a feel for the spray pattern and pressure needed to match the wall's texture. This requires finesse but is the only way to make the repair truly invisible.
Sanding and Priming: The Keys to a Flawless Finish
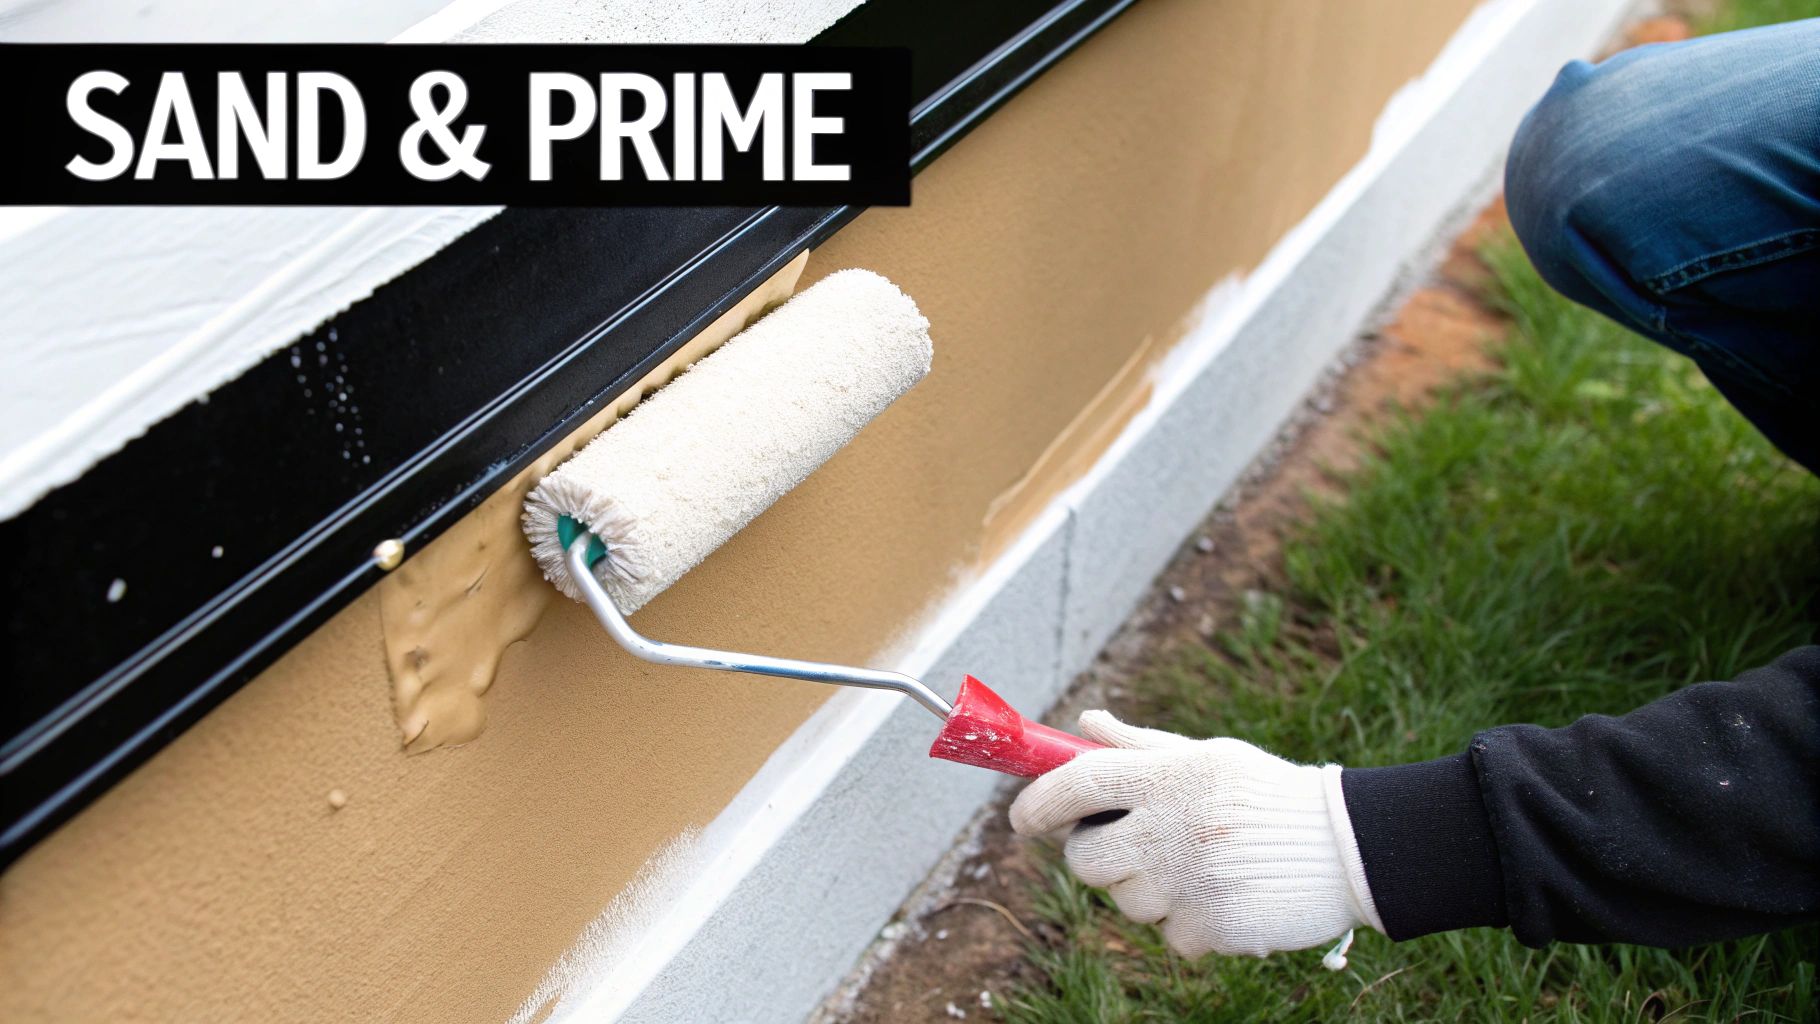
With the walls clean and patches dry, the final preparation steps—sanding and priming—are what elevate a DIY job to a professional standard. These steps ensure the new colour applies smoothly, matches the paint chip, and has maximum durability.
Sanding in this context is not about aggressive abrasion. The objective is to create a fine, microscopic texture, known as a "tooth." This tooth provides a surface for the primer to grip, creating a strong bond that prevents future peeling or chipping.
Getting That Invisibly Smooth Surface
Once the spackle or joint compound has fully cured, the repairs must be made invisible. A light touch is key. The goal is not to remove the patch, but to feather its edges until they blend seamlessly with the wall.
The choice of sandpaper grit is important.
- 120-Grit Sandpaper: This is the starting point for sanding patches. It is coarse enough to smooth high spots without damaging the surrounding drywall paper.
- 220-Grit Sandpaper: This finer grit is used for the final pass. It is perfect for feathering the edges of the repair, eliminating transition lines and creating a uniform surface.
For small patches, use a sanding block to maintain even pressure. For larger areas, a pole sander is more efficient and ensures consistency. Sand with a gentle, circular motion, stopping frequently to check the surface by hand. Any perceptible ridge will be visible through the paint.
Priming: The Non-Negotiable Final Step
With the walls perfectly smooth, it is time for primer. Primer is the foundation for paint. It is a problem-solver that seals porous patches, prevents stains from bleeding through, and creates a uniform canvas for a rich and even colour application.
Skipping primer is a common and costly error. Patched areas are porous and absorb paint differently than the rest of the wall, resulting in a blotchy appearance known as "flashing," where the light reflects unevenly and highlights every repair.
A quality primer is the best insurance for a paint job. It guarantees that the colour on the can is the colour on the walls by neutralizing the underlying surface and ensuring uniform absorption.
Professionals never skip this step. In a competitive market like California, the average cost for interior painting can be around $3.30 per square foot, partly due to the time-consuming nature of proper prep work. This highlights the importance of doing it right for a result that justifies the investment.
Choosing the Right Primer for Your Project
Different primers serve different purposes. Selecting the correct one is crucial; using the wrong type can be as detrimental as using none at all.
This guide will help you choose the best primer for your project.
| Primer Type | Best For | When to Use |
|---|---|---|
| Latex-Based Primer | General-purpose use on unpainted drywall and previously painted surfaces. | The standard choice for most interior projects, like painting over a light colour. It’s flexible, fast-drying, and has an easy cleanup. |
| Oil-Based Primer | Blocking stubborn stains like watermarks, ink, or wood tannins. Also effective on glossy surfaces. | For old water damage, permanent marker, or painting over bare wood that could bleed through a water-based product. |
| Shellac-Based Primer | The ultimate stain and odour blocker for severe issues. | For sealing heavy smoke damage, persistent odours, or severe water stains that an oil-based primer cannot handle. |
For a dramatic colour change, such as from a dark to a light colour, ask the paint store to tint your primer. Adding some of the topcoat colour to the primer provides a head start on coverage and can often eliminate the need for a third or fourth coat of paint. For more information, you can learn more about what primer paint is used for.
Your Top Wall Prep Questions, Answered
Even with detailed instructions, questions often arise during a project. A few common questions about prepping walls for paint appear frequently. Here are answers to the most common inquiries from homeowners.
Can I Paint Over Old Wallpaper?
The temptation to paint over old wallpaper to save time is strong, but it is a shortcut that almost always leads to problems.
The moisture in modern latex paint can reactivate old wallpaper glue, causing bubbles, peeling seams, and a poor finish. This creates a more significant and costly problem to fix later. The correct method is to remove the wallpaper, wash off all adhesive residue, and then begin the patching and priming process on a clean surface.
How Long Should Spackle Be Allowed to Dry?
Patience is essential, especially when waiting for patches to dry. The required drying time depends on the product used and the depth of the repair.
- Small nail holes: Lightweight spackle can be ready for light sanding in as little as 30 to 60 minutes.
- Larger cracks or dings: All-purpose joint compound used for larger jobs requires more time. Allow it to cure for at least 24 hours before sanding.
Attempting to sand compound that is still soft will gum up the sandpaper, tear the patch from the wall, and create a gouged, uneven surface that requires re-repair. Always consult the manufacturer's directions, but allowing extra drying time is a safe practice.
Is it Absolutely Necessary to Prime Over Old Paint?
The answer depends on the project. While "paint and primer in one" products may suffice for simple jobs—like repainting a light wall with a similar light colour—a dedicated primer is often necessary for a flawless, durable finish.
A separate primer should always be used in these situations:
- Significant Colour Changes: When going from a dark to a light colour, a tinted primer will significantly reduce the number of topcoats required, saving time and money.
- Stubborn Stains: Water spots, permanent marker, or smoke stains will bleed through multiple coats of regular paint. A high-quality, stain-blocking primer is the only way to seal them permanently.
- Glossy Surfaces: New paint will not adhere well to an old, glossy finish. A light scuff-sanding followed by a coat of bonding primer provides the necessary grip for the new paint.
- New Patches: Fresh joint compound is highly porous and will absorb paint unevenly, causing dull, blotchy spots ("flashing"). Primer seals these patches for a uniform final appearance.
Primer is the ultimate problem-solver. It is the essential bridge between the old wall and the new paint, ensuring true colour and a uniform finish. Skipping it is a gamble.
How Clean Do Walls Actually Need to Be?
Walls should be cleaner than they appear. A wall that looks clean from a distance is often covered in a thin film of dust, grime, and household oils that will prevent paint from adhering properly.
For most living rooms and bedrooms, a simple wash with a sponge and mild detergent, followed by a rinse with clean water, is sufficient. For kitchens and bathrooms, where grease and soap scum accumulate, a TSP substitute is needed to effectively clean the surface. A ten-minute cleaning is one of the best investments to prevent future peeling and chipping.
The extent of prep work is a major factor in professional painting costs. In California, for instance, the cost to paint a room can range from $200 to over $1,500, with much of that variation due to the prep involved. This demonstrates the critical importance of these foundational steps. You can learn more about how prep affects the cost of painting a room on Angi.com.
Ready to skip the prep and get a flawless, professional finish without the hassle? The expert team at Soca Services Painting has been delivering exceptional results to homeowners across Toronto and the GTA for years. Let us handle the details so you can enjoy the beautiful results.


21 Comments